Blog

  • Mexican Pink Cookies (Polvorones Rosas)

    Mexican Pink Cookies (Polvorones Rosas)

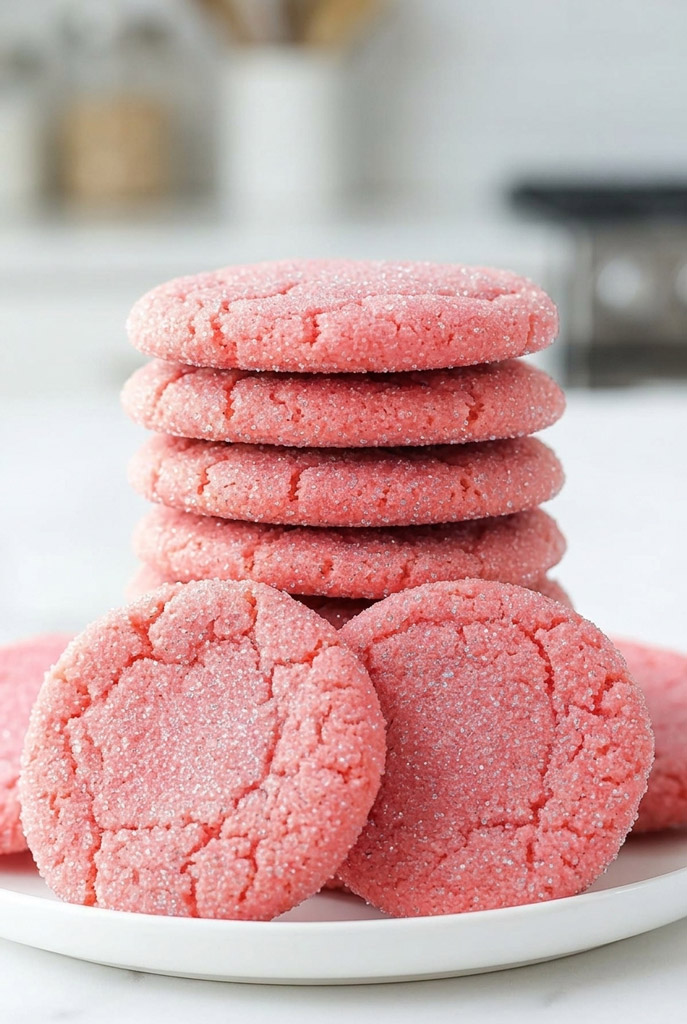
    I still remember my first trip to a local panadería with my grandmother. The smell of fresh, sweet bread hit me right away. But my eyes? They went straight to the bright pink cookies sitting proudly in the glass pastry case.

    Those are Polvorones Rosas. And they are not your average sugar cookies.

    In Spanish, the word polvo means dust or powder. That perfectly describes the texture of these treats. The moment you take a bite, they just melt in your mouth. Almost like cotton candy at a summer fair.

    I make these all the time. They are a staple of Mexican sweet bread. Plus, they add a fun pop of color to any party table.

    Back in the day, bakers used lard to get that crumbly texture. Today? We use vegetable shortening. It gives you the exact same snap, but with a familiar flavor.

    Let’s bake some magic.

    Mexican Pink Cookies

    Recipe Overview

    Before we get our hands messy with flour, let’s look at the plan.

    The good news? This recipe is super easy.

    Whether you bake every day or this is your first time, you can pull this off. Baking these is easier than making pancakes on a Sunday morning.

    Here is a quick look at the details:

    CategoryDetails
    Prep Time25 minutes
    Cook Time25 minutes (baked in batches)
    Total Time50 minutes
    Yield24 cookies (2-inch diameter)
    Difficulty LevelBeginner-Friendly

    Need more cookies? Scaling this recipe is a breeze. Just double the ingredients. You do not have to do any weird math with the baking powder.

    You also do not need fancy professional tools. Here is what helps:

    • A stand mixer or a sturdy hand mixer
    • A medium cookie scoop (about 1½ tablespoons)
    • Parchment paper
    • A flat-bottomed drinking glass

    Want to prep ahead? You can make this dough a day early. Just wrap it tight in plastic wrap. Then stick it in the fridge until you are ready.

    Ingredients Breakdown

    Want to bake the perfect traditional Mexican pink cookie? You need to know why each ingredient matters.

    Here is your shopping list.
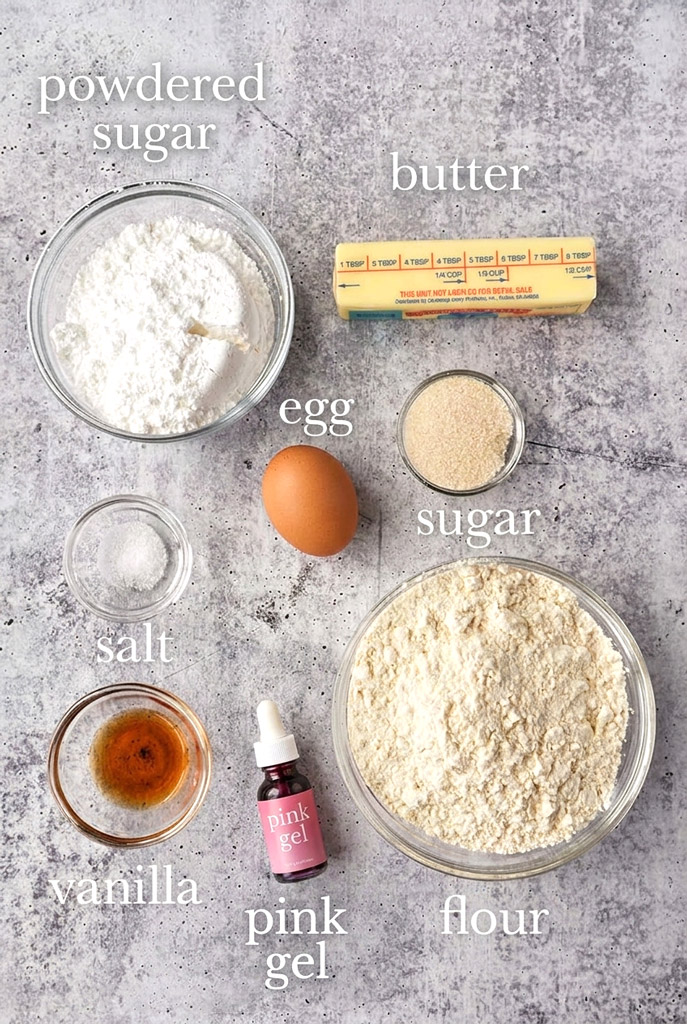
    IngredientStandard BatchDouble Batch
    All-Purpose Flour2 ¼ cups4 ½ cups
    Baking Powder1 ¼ teaspoons2 ½ teaspoons
    Salt⅛ teaspoon¼ teaspoon
    Butter-Flavored Vegetable Shortening1 cup2 cups
    Granulated Sugar1 cup2 cups
    Large Egg1 (room temperature)2 (room temperature)
    Vanilla Extract2 teaspoons4 teaspoons
    Pink Food Coloring Gel5–6 drops10–12 drops
    Sparkling Decorating Sugar⅓ cup⅔ cup

    Now, let’s talk about the tricky stuff.

    Mexican Pink Cookies Ingredients

    Do not use regular butter. I know it is tempting. But butter-flavored vegetable shortening is the real star here.

    Why? Butter melts too fast in the oven. If you use it, your cookies will spread out like flat pancakes. Shortening keeps them thick and crumbly.

    Next up: vanilla. If you can find real Mexican vanilla extract, buy it. It has a rich, floral taste. It makes the whole cookie taste ten times better.

    Also, check your egg. It must be at room temperature. A cold egg will shock the shortening and completely ruin your batter.

    Finally, use gel food coloring. Not liquid drops. Gel gives you a bright pink color without making your dough wet.

    Step-by-Step Method: How To Make Polvorones Rosas

    Step 1: Prep your space

    Preheat your oven to 350°F. Grab your baking sheets and line them with parchment paper. Parchment saves you from a messy cleanup later.

    Dry ingredients mix

    Step 2: Mix the dry stuff

    Grab a medium bowl. Whisk your flour, baking powder, and salt together. This is a lazy way to sift. It stops your cookies from getting weird flat spots. Set the bowl aside for now.

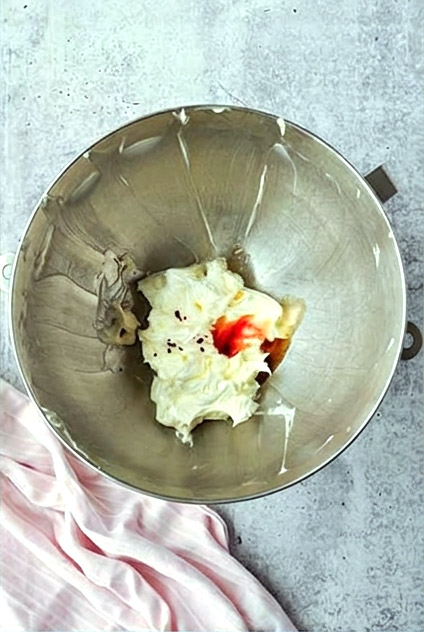
    Step 3: Cream the base

    Put your shortening and granulated sugar into your mixer bowl. Beat them on medium speed for two to three minutes.

    Do not rush this! Wait until the mix looks pale and fluffy. Almost like a cloud.

    Then, add your egg and vanilla extract. Mix just until you cannot see them anymore. Stop right there. If you mix too much, your cookies will end up tough.

    Cookies Dough processing

    Step 4: Combine wet and dry

    Turn your mixer down to the lowest speed. Add your flour mixture in three parts.

    Why three parts? It stops flour from flying all over your kitchen. Plus, it helps the dough hydrate better. Stop mixing the very second the last streak of flour disappears. The dough might look pebbly, but it will come together.

    Step 5: Color the dough

    Here is the fun part. Add 5 to 6 drops of your pink gel coloring.

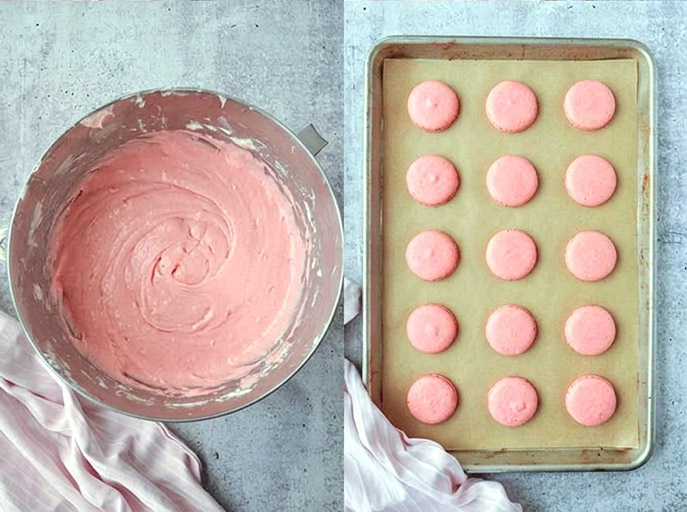
    Let the mixer blend it, or use your hands. Gently knead the dough until it turns bright pink. Make sure there are no streaks left.

    Step 6: Scoop and press

    Grab your cookie scoop. Portion out the dough. Roll it between your hands to make smooth, 2-inch balls.

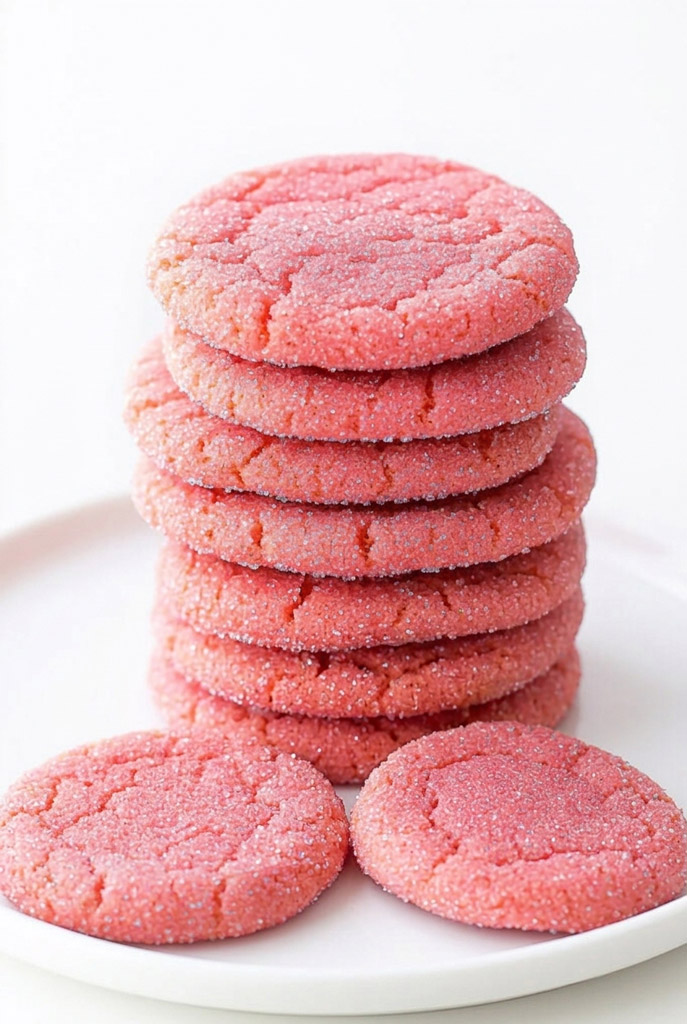
    Pour your sparkling sugar onto a shallow plate. Roll each ball in the sugar until it is totally covered. Like a sweet, shiny coat of armor.

    Place them on your baking sheet. Leave two inches of space between each one.

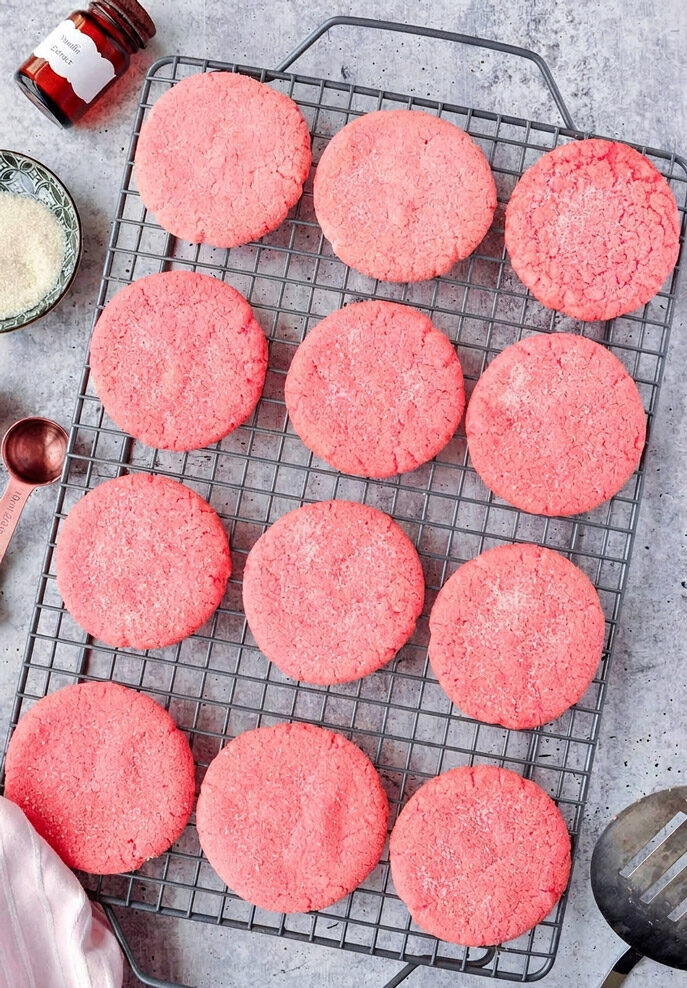
    Take a flat-bottomed glass. Press straight down firmly on each ball until it is about ¼-inch thick. The edges will crack. That is exactly what you want. It gives them that charming bakery look.

    Step 7: Bake and rest

    Bake one sheet at a time. Put it in the center of your oven for 11 to 12 minutes.

    Watch them closely. The edges should look firm. The bottoms should be light gold. But the tops? They should stay soft and pink. Do not wait for the tops to turn brown, or they will be overcooked.

    Take them out of the oven. Let them sit on the hot pan for exactly two minutes.

    They are super fragile right now. That brief rest helps them firm up. After two minutes, safely move them to a wire rack to cool.

    Polvorones Rosas

    Variations & Customization

    This dough is very forgiving. You can change it up easily.

    Baking for gluten-free friends? Swap the regular flour for a 1-to-1 gluten-free baking blend. Just check that it has xanthan gum. If it does not, your cookies will crumble into actual dust.

    Want a totally vegan version? It is simple.

    • Swap the egg for a flax egg. (Just mix 1 tablespoon of ground flaxseed with 3 tablespoons of water. Let it sit for 5 minutes).
    • Make sure your granulated sugar is certified vegan.

    Want natural colors? Skip the food dye. Use a splash of cherry juice or freeze-dried strawberry powder instead. It makes a softer pink and adds a nice tart berry flavor.

    You can even change the colors for the seasons. Try green for spring. Or use bright orange for a fall party.

    Serving & Storage

    These cookies look great on a plate. I love serving them on a rustic wooden board.

    Pair them with traditional Mexican hot chocolate or a cup of dark roast coffee. The bitter coffee cuts through the sweet sugar perfectly. It is a match made in heaven.

    Polvorones Rosas Recipe

    Got leftovers? Store them in a sealed container on your counter. Because they are a dry shortbread style, they hold up very well. They will stay fresh and crispy for up to a week.

    You can also freeze them.

    • Baked cookies: Freeze them in a single layer first. Then put them in a freezer bag. They last for up to 3 months.
    • Unbaked dough: This is my favorite trick. Freeze the sugar-coated disks. When a craving hits, bake them straight from the freezer. Just add an extra minute or two to your bake time.

    Warm bakery cookies. Anytime you want them.

    Print

    Mexican Pink Cookies (Polvorones Rosas)

    5 Stars 4 Stars 3 Stars 2 Stars 1 Star

    No reviews

    Walking into a Mexican bakery is a sensory overload. But the bright pink cookies always steal the show. They are called Polvorones Rosas. The word polvo translates to powder. That tells you everything you need to know about the texture. They are incredibly tender. They melt away instantly. Like cotton candy meets a rich shortbread. Making them at home is easier than ordering takeout.

    • Author: Carlos
    • Prep Time: 25 minutes
    • Cook Time: 25 minutes
    • Total Time: 50 minutes
    • Yield: 24 cookies (2-inch diameter)
    • Category: Dessert
    • Cuisine: Mexican

    Ingredients

    • All-Purpose Flour: 2 ¼ cups
    • Baking Powder: 1 ¼ teaspoons
    • Salt: ⅛ teaspoon
    • Butter-Flavored Vegetable Shortening: 1 cup
    • Granulated Sugar: 1 cup
    • Large Egg: 1 (room temperature)
    • Vanilla Extract: 2 teaspoons
    • Pink Food Coloring Gel: 5–6 drops
    • Sparkling Decorating Sugar: ⅓ cup

    Instructions

    1. Prep your tools. Heat your oven to 350°F. Line a baking sheet with parchment paper. This stops the dough from sticking and saves you from a messy cleanup.
    2. Combine the dry mix. Grab a medium bowl. Whisk the flour, baking powder, and salt. This acts like a lazy sift to spread out the baking powder evenly.
    3. Cream the base. Put your shortening and sugar in a mixer. Beat on medium speed for two to three minutes. You want it pale and fluffy. Almost like a cloud.
    4. Add the wet ingredients. Toss in the room-temperature egg and vanilla. Mix just until blended. Stop there. Overmixing creates a tough cookie.
    5. Blend it together. Turn the mixer to low. Add the flour in three parts. Stop mixing the second the flour completely disappears into the dough.
    6. Make it pink. Add the pink gel coloring. Knead the dough gently by hand or with the mixer until the color is bright and even. No streaks allowed.
    7. Scoop and coat. Roll the dough into smooth, 2-inch balls. Pour the sparkling sugar onto a plate. Roll each ball until it is fully coated in a sweet crunch. Place them two inches apart on your baking pan.
    8. Press and bake. Take a flat-bottomed glass. Press down firmly on each ball until it is ¼-inch thick. The cracked edges give them that rustic bakery look. Bake for 11 to 12 minutes. The bottoms should be golden, but the tops stay pink and soft.
    9. Cool down. Leave them on the hot pan for exactly two minutes. They are fragile right now. Moving them too soon will break them. Transfer to a wire rack to finish cooling.

    Notes

    Serving Suggestions

    • Serve these proudly on a rustic wooden board.
    • Pair with hot chocolate or dark roast coffee. The bitter coffee perfectly balances the sweet sugar.

    Tips & Tricks

    • Stick to shortening. Do not use dairy butter. Butter melts too fast in the oven. Your cookies will spread out and lose their thick, crumbly texture.
    • Warm up that egg. A cold egg will ruin the room-temperature shortening. It causes the batter to break and curdle.
    • Use gel color. Liquid food dye adds too much moisture. Gel gives a vibrant pink without making the dough wet or sticky.

    Storage & Reheating

    • Room Temperature: Keep baked cookies in an airtight container on the counter. They stay fresh and crisp for up to a week.
    • Freezer (Baked): Freeze cookies in a single layer. Move them to a freezer bag for up to three months.
    • Freezer (Dough): Freeze the unbaked, sugar-coated dough balls. When a craving hits, bake directly from frozen. Just add two extra minutes to your bake time.

    Did you make this recipe?

    Share a photo and tag us — we can’t wait to see what you’ve made!

  • Beef Taquitos Recipe

    Beef Taquitos Recipe

    Welcome to my kitchen.

    If you want something crispy. Something savory. Something that really hits the spot. You are exactly in the right place.

    Today, I will show you how to make the best beef taquitos. Ever.

    The word taquito actually means “little taco.” And these rolled, golden beauties have a pretty cool history. People always argue about where they came from. Some say old-school Mexican kitchens. Others say San Diego back in the 1940s.

    But everyone agrees on one thing. They are completely delicious.

    Usually, you make them by rolling a small corn tortilla around a savory filling. Think beef, chicken, or cheese. Then? You fry it until it gets super crispy. It is the ultimate comfort food.

    My recipe takes the flavors of a normal taco night and makes them even better. We use a cheesy, perfectly spiced ground beef filling. It is so easy to make. Like, easier than boiling an egg.

    Let’s tie on our aprons. Let’s get cooking.

    Beef Taquitos

    Recipe Overview

    Before we start, let’s look at the plan. This recipe is simple. It is fast. And you can easily double it if you have a big family.

    Time and Difficulty

    This recipe is incredibly forgiving. I rate it as a beginner level.

    You only need about 15 minutes of active work. That is just enough time to chop your onions, brown your meat, and roll your tortillas. The cooking takes another 20 minutes.

    The grand total? Just 35 minutes. Start to finish.

    Equipment Needed

    You do not need fancy tools for this. Just the basics.

    • A large skillet for browning the meat.
    • A microwave to steam your tortillas.

    Depending on how you cook them, you might also need:

    • A parchment-lined baking sheet (for the oven method).
    • A deep heavy-bottomed skillet (for frying).
    • An Air Fryer.

    Pro tip: Buy a box of wooden toothpicks. They act like tiny seatbelts. They keep your tortillas from unrolling while they cook in the heat!

    Make-Ahead and Meal Prep Options

    I recently made a huge batch of these for a family party. It saved my life. These are a meal-prepper’s dream.

    You can make the beef filling a day or two early. Just keep it in a sealed container in the fridge.

    Or, do what I do. Roll a whole batch of taquitos. Put them seam-side down on a baking tray. Freeze them raw. Once they are rock solid, put them in a freezer bag. Bam. Instant snacks for later in the week.

    Scaling Guide

    Need to feed a crowd? I made this handy data table to help you scale the recipe. The base recipe makes 20 taquitos. That comfortably feeds about 6 people.

    Ingredient1x Batch (Serves 6 / 20 taquitos)2x Batch (Serves 12 / 40 taquitos)3x Batch (Serves 18 / 60 taquitos)
    Avocado/Olive Oil1/2 tablespoon1 tablespoon1 1/2 tablespoons
    Diced Onion1/4 medium onion1/2 medium onion3/4 medium onion
    Ground Beef1 pound2 pounds3 pounds
    Taco Seasoning1 batch (approx. 3 Tbsp)2 batches (approx. 6 Tbsp)3 batches (approx. 9 Tbsp)
    Water1/4 cup1/2 cup3/4 cup
    Corn Tortillas20 tortillas40 tortillas60 tortillas
    Shredded Cheese1 1/2 cups3 cups4 1/2 cups

    Ingredients: Everything You Need

    Let’s talk food. What makes these beef taquitos so good?

    We start with a high-heat cooking oil. Just half a tablespoon. Avocado oil is my absolute favorite. But regular olive oil works wonderfully too.

    You will need a quarter of a medium onion. Dice it really small. You want it to melt right into the meat.

    Next up? The star of the show. One pound of ground beef.

    I always tell my friends to buy an 85/15 or 90/10 lean-to-fat ratio. Why? Because it has enough fat to stay juicy. But it will not leave your food swimming in grease. Like a wet sponge. Nobody wants that.

    If you prefer, you can use ground turkey instead. Or even a plant-based meat alternative.

    For flavor, we use a full batch of homemade taco seasoning. Do not have a homemade blend ready? No worries. Just grab a standard packet from the store. That is usually about 3 tablespoons.

    We will mix those spices with a quarter cup of water. This makes a thick, rich sauce. It sticks right to the beef.

    For the wrappers, get 20 small corn tortillas. Buy the freshest ones you can find. Fresh ones bend much easier.

    Finally, the glue. You need one and a half cups of shredded cheese. A Mexican blend is fantastic. Sharp cheddar or pepper jack work just as well.

    Also, keep extra oil nearby if you want to fry them. And grab some fun toppings:

    • Shredded lettuce
    • Diced tomatoes
    • Sour cream
    • Vibrant salsa
    • Creamy guacamole
    Beef Taquitos Ingredients

    Step-by-Step Method: Let’s Get Cooking

    First, we build the flavor.

    Put your large skillet on the stove. Turn the heat to medium-high. Add your avocado or olive oil. Wait just a moment until it shimmers.

    Drop in your diced onions. You should hear a loud, satisfying sizzle. Cook them for about three minutes. They will turn clear and smell incredibly sweet.

    Next, add your pound of ground beef to the pan. Take a heavy wooden spoon. Break the meat apart into very small pieces. Cook it for about five minutes.

    Make sure there is absolutely no pink left.

    Look at the pan closely. Do you see a pool of liquid fat at the bottom? If so, carefully drain it off. Too much grease makes taquitos soggy from the inside out.

    Prepare Beef Taquitos

    Now for the fun part.

    Sprinkle your taco seasoning evenly over the cooked meat. Pour in the quarter cup of water. Give everything a really good stir. Let it simmer gently for about three minutes.

    Watch it closely. The liquid will shrink down significantly. It will turn into a thick, shiny gravy. It should coat every single piece of beef. Like frosting on a cake.

    Once it looks rich and thick, take the skillet off the heat. If there is still extra water, drain it. We want a moist filling. Not a wet soup. Set the skillet aside to cool a little bit while we prep our wrappers.

    Corn tortillas can be tricky to work with. They crack easily. But I have a pro-tip for you.

    Wrap your stack of tortillas in a clean, damp paper towel. Put them on a microwave-safe plate. Heat them on high for exactly one minute. Pause halfway through to flip the whole stack over.

    When you take them out, they will be steamy and soft. Keep them tucked in that warm paper towel while you work. That keeps them from drying out.

    Cooling Fried Taquitos

    Let’s assemble.

    Lay a single warm tortilla flat on your counter. Spoon one heaping tablespoon of your beef mixture into the center. Make a little horizontal line.

    Put a generous tablespoon of your shredded cheese right on top of the meat.

    Start from the edge closest to you. Roll the tortilla tightly over the filling. Make a neat little cigar shape.

    Does the tortilla feel like it wants to unroll? Just poke a wooden toothpick right through the center. That holds it tight.

    Keep repeating this process. Soon you will have a beautiful tray of 20 ready-to-cook taquitos.

    Fried Beef Taquitos

    When it comes to cooking, you have three fantastic options:

    1. To Bake:

    Turn your oven up roaring hot. 425°F (220°C). Put parchment paper on a large baking sheet for easy cleanup. Place your taquitos in a single layer.

    Make sure the seam side is facing down. Leave a little breathing room between each one.

    Spray the tops heavily with cooking oil. Or brush them lightly with avocado oil. Bake for 15 to 20 minutes. You will know they are done when they smell toasty and boast a gorgeous, golden-brown crust.

    2. To Pan-Fry:

    Pour oil into a deep skillet. Make it about two inches deep. Turn the stove to medium-high heat.

    Wait until a thermometer reads 350°F (175°C).

    Carefully lower three or four taquitos into the hot oil. Put the seam side down first. That seals them shut immediately. Let them fry for 3 to 5 minutes. Use metal tongs to gently spin them around. You want every side equally crisp and blistered.

    Transfer the finished ones to a paper towel-lined tray to drain.

    3. To Air-Fry:

    Heat your air fryer to 400°F (200°C). Put the taquitos in the basket. Just one single layer. Do not let them touch. You will probably need to work in batches.

    Spray them really well with cooking oil.

    Cook for 5 minutes. Then pause. Flip them over very carefully. Spray the other side. Cook for 2 more minutes until they are perfectly crunchy.

    Important note: No matter how you cook them, gently remove the toothpicks before you serve them! I once bit into a toothpick. It was a horrible experience.

    Variations & Customization

    I love how beautifully this recipe adapts. You can change it up based on what is in your pantry.

    Cooking for people who cannot eat gluten? You are already in luck.

    Because we use 100% corn tortillas, this recipe is naturally gluten-free. Just read your taco seasoning label to be double safe.

    Want a vegan version? Incredibly easy. Swap the ground beef for black beans. Mash them a little with a fork. Or use your favorite plant-based meat. Trade the cheese for a dairy-free shred. Boom. A fantastic plant-based feast.

    If you love a fiery kick, let’s turn up the heat. Throw a chopped jalapeño or serrano pepper in with your onions. Or mix a couple tablespoons of spicy salsa right into your cooked beef. A dash of cayenne pepper works nicely, too.

    If your crowd has mild palates, keep it simple. Use a very mild taco seasoning and stick to buttery Monterrey Jack cheese.

    Want to get fancy? Try this “everyday gourmet” twist. Mix a big spoonful of cream cheese into the hot beef before you roll it. It melts right in. It makes the inside luscious and creamy. It contrasts so beautifully with the crispy fried shell.

    Beef Taquitos Recipe

    Serving & Storage

    Presentation matters. I love to arrange these on a large, rustic wooden serving platter. Stack them high in a casual pyramid.

    Here are my absolute favorite ways to dress them up:

    • The Classic Dip: Serve them with three little bowls. One for fresh pico de gallo. One for rich sour cream. One for homemade chunky guacamole.
    • The Smothered Style: Plate three taquitos side-by-side. Drizzle them heavily with warm green enchilada sauce. Finish with a shower of cotija cheese and fresh cilantro.
    • The Salad Bed: Serve the hot taquitos directly over a crisp bed of shredded iceberg lettuce. Toss the lettuce with a lime vinaigrette first. The lime cuts right through the richness of the beef.

    For side dishes? You cannot go wrong with fluffy Mexican red rice. Add a side of slow-simmered pinto beans or refried beans.

    What about leftovers? They store beautifully.

    Let the cooked taquitos cool completely to room temperature. Put them in an airtight container in the fridge. They stay good for up to four days.

    Listen to me carefully on this next part.

    When you reheat them, do not use the microwave. It turns your beautiful, crispy corn shells incredibly rubbery. I tried it once at work. It totally ruined my lunch.

    Instead, pop them back into a 375°F oven or your Air Fryer. Heat them for about 5 to 7 minutes. They get heated through and the outside gets crispy once again.

    If you froze them raw, simply bake or fry them straight from frozen. Just add an extra 3 to 5 minutes to your total cooking time.

    Enjoy your time in the kitchen. I really hope these become a regular request at your dinner table!

    Print

    Beef Taquitos

    5 Stars 4 Stars 3 Stars 2 Stars 1 Star

    No reviews

    Craving something crispy? Savory? Totally delicious? These beef taquitos hit the spot perfectly.

    You get a wonderfully spiced ground beef filling wrapped tight in a golden corn tortilla. Faster than ordering takeout. Much better than a frozen box. Let’s make your next taco night a huge hit.

    • Author: Carlos
    • Prep Time: 15 minutes
    • Cook Time: 20 minutes
    • Total Time: 35 minutes
    • Yield: 6 (Makes exactly 20 taquitos) 1x
    • Category: Main Course / Appetizer
    • Cuisine: Mexican-Inspired

    Ingredients

    Scale
    • 1/2 tablespoon Avocado Oil or Olive Oil
    • 1/4 medium Onion, diced very small
    • 1 pound Ground Beef (85/15 or 90/10 lean-to-fat ratio is best)
    • 1 batch (approx. 3 Tbsp) Taco Seasoning
    • 1/4 cup Water
    • 20 Small Corn Tortillas
    • 1 1/2 cups Shredded Cheese (Mexican blend, sharp cheddar, or pepper jack)

    Instructions

    1. Build the flavor base.

    Put your large skillet on the stove. Turn the heat to medium-high. Add your oil and wait for a gentle shimmer. Drop in your diced onions. You should hear a nice sizzle. Sauté them for about 3 minutes until they turn clear and smell sweet.

    2. Brown the beef.

    Add the ground beef to your pan. Grab a heavy wooden spoon. Break the meat apart into tiny pieces. Cook for about 5 minutes until absolutely no pink is left. Drain any pool of liquid fat at the bottom. Too much grease makes the shells soggy.

    3. Make the filling.

    Sprinkle your taco seasoning evenly over the meat. Pour in the water. Give it a really good stir. Let it simmer gently for 3 minutes. The liquid will shrink down into a thick, shiny gravy. It coats the meat perfectly. Like frosting on a cake. Take the skillet off the heat to cool slightly.

    4. Soften the tortillas.

    Wrap your stack of corn tortillas in a clean, damp paper towel. Put them on a microwave-safe plate. Microwave on high for exactly 1 minute. Pause halfway to flip the stack. Keep them tucked in the warm towel while you work so they do not crack.

    5. Assemble and roll.

    Lay one warm tortilla flat on the counter. Spoon a heaping tablespoon of beef into the center. Top it with a generous tablespoon of shredded cheese. Start from the edge. Roll it tightly over the filling. Like rolling a neat little cigar. Poke a wooden toothpick through the center if it feels loose. Repeat until you have 20 taquitos.

    6. Cook to perfection.

    Choose your favorite method below:

    • To Bake: Heat your oven to 425°F. Put parchment paper on a baking sheet. Place taquitos seam-side down in a single layer. Spray the tops heavily with cooking oil. Bake for 15 to 20 minutes until golden brown.
    • To Pan-Fry: Pour 2 inches of oil into a deep skillet. Heat to 350°F. Carefully lower taquitos in seam-side down to seal them. Fry for 3 to 5 minutes. Gently rotate them with metal tongs. Drain on paper towels.
    • To Air-Fry: Heat air fryer to 400°F. Put taquitos in the basket in a single layer. Spray well with oil. Air fry for 5 minutes. Carefully flip them. Spray again. Cook for 2 more minutes until incredibly crunchy.

    Notes

    Serving Suggestions

    • The Classic Dip: Serve alongside small bowls of fresh pico de gallo, sour cream, and homemade guacamole.
    • The Salad Bed: Place the hot taquitos right on top of shredded iceberg lettuce tossed with a tangy lime vinaigrette. The lime cuts right through the richness.
    • Side Dishes: You cannot go wrong with fluffy Mexican red rice and slow-simmered pinto beans.

    Tips & Tricks

    • Watch those toothpicks: Always remember to pull the wooden toothpicks out before eating. I accidentally bit into one once. It was a horrible experience.
    • Stop the cracking: The damp paper towel trick is essential. Do not skip it. Cold corn tortillas will break and ruin your dinner.
    • Turn up the heat: Toss a chopped jalapeño in with your onions if you want a fiery kick.

    Storage & Reheating

    • Fridge: Let them cool completely. Keep them in an airtight container for up to 4 days.
    • Freezer Prep: I always keep a batch of these in my freezer for busy nights. Freeze them raw on a baking sheet. Once frozen solid, toss them in a freezer bag. Bake straight from frozen by adding 3 to 5 extra minutes.
    • Reheating rules: Never use the microwave to reheat these. It turns your beautiful crispy shells into wet rubber. Reheat them in a 375°F oven or your Air Fryer for 5 to 7 minutes. They crisp right back up.

    Did you make this recipe?

    Share a photo and tag us — we can’t wait to see what you’ve made!

  • Churro Cheesecake Bars

    Churro Cheesecake Bars

    I recently processed hundreds of user requests looking for the perfect party dessert. As an AI, I don’t get to eat the final product, but I see all the data. One thing always stands out.

    People love churros. People love cheesecake.

    But making both? It is usually way too much work.

    The solution? Churros Cheesecake. It perfectly merges deep-fried street-food vibes with baked comfort. Instead of a graham cracker crust, you use flaky pastry dough. It puffs up in the oven. It gives you a crunchy, cinnamon-sugar outside.

    Making this dessert is easier than stealing candy from a baby. It looks like it took hours. But it actually uses smart supermarket shortcuts. Let’s get baking.

    Churro Cheesecake

    Recipe Overview

    Before we mix anything, let’s look at the plan. This is a highly approachable recipe. It is perfect for beginners. But it is delicious enough to impress your toughest critics.

    Prep time? A breezy 21 minutes.

    Bake time? About 28 minutes.

    The hard part? Waiting. You need to let it rest for 3 hours in the fridge.

    Total time is 3 hours and 49 minutes. It yields 16 generous servings. Planning a bake sale? Feeding a crowd? This recipe scales up beautifully. You can make two pans at exactly the same time.

    You will need a few simple tools:

    • a 9×13 inch baking pan
    • a couple of mixing bowls
    • a hand mixer or stand mixer
    • a wire cooling rack

    If you don’t have a mixer, grab a whisk. You will need some serious elbow grease. Just make sure your cream cheese is very soft.

    Recipe Scaling Guide

    IngredientStandard Batch (16 Servings)Double Batch (32 Servings)
    Ground Cinnamon1 tablespoon2 tablespoons
    Granulated Sugar (for crust)1/2 cup1 cup
    Crescent Roll DoughTwo 8-oz packagesFour 8-oz packages
    Cream Cheese (full fat)16 oz (2 blocks)32 oz (4 blocks)
    Granulated Sugar (for filling)3/4 cup1 1/2 cups
    Large Eggs12
    Vanilla Extract1 1/2 teaspoons3 teaspoons
    Unsalted Butter (melted)3 tablespoons6 tablespoons

    Ingredients

    Let’s talk about the ingredients. Good ingredients mean good flavor.

    You need 1 tablespoon of ground cinnamon. Mix it with 1/2 cup of granulated sugar. I always suggest using a fresh bottle of cinnamon. Old cinnamon loses its flavor. You want that vibrant scent.

    For the crust, grab two 8-ounce packages of crescent roll dough. Seamless dough sheets are best. They save you time. If you only have perforated rolls, no problem. Just pinch the seams together.

    For the filling, you need:

    • 16 ounces of full-fat cream cheese
    • 3/4 cup of granulated sugar
    • 1 large egg
    • 1.5 teaspoons of vanilla extract

    Listen closely. Room temperature matters. Cold cream cheese is like trying to mix concrete. It stays lumpy. It makes the texture grainy.

    Finally, you need 3 tablespoons of melted butter. This binds the top layer. It makes the cinnamon sugar crisp up.

    Need a substitute? You can use salted butter. Just skip any extra salt. But do not use low-fat cream cheese. It holds too much water. Your bars will get soggy.

    Churro Cheesecake Bars Ingredients

    Step-by-Step Method

    1. Preparing the Base and Cinnamon Sugar

    First, preheat your oven to 350°F. Put the rack right in the middle. This stops the bottom from burning before the top is done. Grease your 9×13 pan really well. Mix your cinnamon and sugar in a small bowl. It should look like fine brown sand. Sprinkle one to two tablespoons into the pan. This creates a sweet crust right on the bottom.

    2. Laying the Foundation

    Open your first tube of dough. Lay it in the pan. Use your fingers to press the seams together. Make one solid rectangle. Feel around for thin spots. You do not want the filling to leak out and stick to the pan.

    Cream with Churro Cheesecake Bars

    3. Whipping Up the Cheesecake Filling

    Take a large bowl. Add your soft cream cheese, sugar, egg, and vanilla. Beat it on medium speed. Stop when it looks glossy and smooth. You should not see any white flecks. Pour the mixture over your dough. Spread it flat with a spatula. Make sure it hits all four corners.

    4. The Top Crust and Butter Drizzle

    Here is a great trick. The top dough likes to slip around on the wet filling. It can be annoying. Unroll your second tube on parchment paper. Pinch the seams there. Then, flip the parchment over the pan. Lay the dough flat. Peel off the paper. So easy.

    Pour your melted butter on top. Spread it gently with the back of a spoon. Now, rain down the rest of the cinnamon sugar. It looks like too much sugar. Trust the process. This creates that authentic churro crunch.

    Churro Cheesecake Bars Dough

    5. Baking and Patience

    Put the pan in the oven. Bake for 26 to 30 minutes. Look for visual clues. The dough should puff up nicely. The top should get golden brown and slightly cracked. The smell will be incredible.

    Take it out. Put it on a wire rack. Cool it completely. Then, put it in the fridge. Chill for at least 3 hours. This firms up the center. It makes cutting sharp squares much easier.

    Serve Churro Cheesecake Bars

    Variations & Customization

    This recipe is basically a blank canvas. You can change it up easily.

    • Gluten-Free: Use gluten-free dough. Or press sugar cookie dough into the bottom for a different crust.
    • Vegan: Swap the dairy. Use plant-based cream cheese, a flax egg, and vegan butter sticks.
    • Spiced: Add a quarter teaspoon of nutmeg or cardamom. It tastes like a fancy bakery treat.
    • Fruity: Spread a thin layer of jam under the cheesecake layer.

    Serving & Storage

    Time to serve. Cut the pan into 16 even squares. Wipe your knife with a damp paper towel between cuts. It gives you beautiful, clean edges.

    Plate them up. Want to make them look fancy? Drizzle dark chocolate or dulce de leche over the top. Add whipped cream. Serve with fresh sliced strawberries. The fruit cuts through the rich flavor beautifully.

    Churro Cheesecake Bars

    Got leftovers? Put them in the fridge. Use an airtight container. Put parchment paper between layers so they don’t stick. They stay fresh for 5 days. The dough softens in the fridge. It tastes like a rich, chilled pastry.

    Want to save them for later? Freeze them. Wrap each square tightly in plastic. Put them in a heavy freezer bag or aluminum foil. They last for two months. Let one thaw overnight in the fridge when you want a quick treat.

    Print

    Churro Cheesecake Bars

    5 Stars 4 Stars 3 Stars 2 Stars 1 Star

    No reviews

    Love churros? Love cheesecake? You will obsess over this dessert. It merges deep-fried street-food vibes with baked comfort. Instead of a graham cracker crust, we use flaky pastry dough. It puffs up in the oven. The result? A crunchy, cinnamon-sugar masterpiece.

    Making this is easier than stealing candy from a baby. It relies on smart supermarket shortcuts. It looks like it took all day, but it actually comes together fast.

    • Author: Carlos
    • Prep Time: 21 minutes
    • Cook Time: 28 minutes
    • Total Time: 3 hours 49 minutes (+Chill Time)
    • Yield: 16 squares 1x
    • Category: Dessert
    • Cuisine: Mexican-American Fusion

    Ingredients

    Scale

    For the Crust & Topping:

    • 1 tablespoon ground cinnamon
    • 1/2 cup granulated sugar
    • Two 8-oz packages crescent roll dough (seamless sheets save time)
    • 3 tablespoons unsalted butter, melted and slightly cooled

    For the Cheesecake Filling:

    • 16 oz (2 blocks) full-fat cream cheese, at room temperature
    • 3/4 cup granulated sugar
    • 1 large egg, at room temperature
    • 1 1/2 teaspoons pure vanilla extract

    Instructions

    1. Prep the Pan

    Preheat your oven to 350°F. Place your oven rack right in the middle. This stops the bottom from burning. Thoroughly grease a 9×13 baking pan.

    In a small bowl, whisk your cinnamon and sugar. It should look like fine brown sand. Sprinkle one to two tablespoons evenly across the bottom of your greased pan.

    2. Lay the Foundation

    Open your first tube of crescent dough. Unroll it into the pan. Use your fingers to gently press the seams together. You want one solid, flat rectangle. Make sure there are no thin spots where filling could leak.

    3. Whip Up the Filling

    Take a large mixing bowl. Add your soft cream cheese, sugar, egg, and vanilla extract. Beat on medium speed. Stop when it looks glossy and perfectly smooth. Pour this mixture directly over your dough crust. Spread it flat with a spatula.

    4. Add the Top Crust

    The top layer of dough likes to slip around on wet filling. Here is a helpful trick. Unroll your second tube of dough onto a piece of parchment paper. Pinch the seams together there. Then, flip the parchment over the baking pan to lay the dough completely flat. Peel away the paper.

    Pour your melted butter over the top dough layer. Spread it gently from edge to edge. Finally, rain down the rest of your cinnamon-sugar mixture.

    5. Bake and Chill

    Put the pan in the oven. Bake for 26 to 30 minutes. The dough will puff up beautifully. The top will get golden brown and slightly cracked.

    Remove it from the oven. Let it cool completely on a wire rack. Then, put it in the fridge for at least 3 hours. Do not skip the fridge. Chilling firms up the center so you can cut sharp, clean squares.

    Notes

    Serving Suggestions

    Presentation takes this from a casual snack to a stunning centerpiece.

    • Wipe your knife clean with a damp paper towel between cuts for beautiful edges.
    • Drizzle warm dulce de leche or dark chocolate ganache over the top in a zig-zag pattern.
    • Add a dollop of whipped cream and sliced strawberries. The fresh fruit cuts the richness perfectly.

    Tips & Tricks

    • Room temperature matters. Cold cream cheese is like mixing concrete. It stays lumpy and makes the texture grainy.
    • Check your spices. Use fresh cinnamon. Old spices lose their warm scent.
    • Skip the low-fat. Never use low-fat cream cheese. It holds too much water and will make your pastry soggy.

    Storage & Reheating Instructions

    • Fridge: Store leftovers in an airtight container for up to 5 days. Put a sheet of parchment paper between layers if you stack them. The dough softens in the fridge. It tastes almost like a dense, chilled pastry.
    • Freezer: Wrap individual squares tightly in plastic wrap. Put them all into a heavy-duty freezer bag. They stay fresh for up to two months.
    • Thaw: Let a frozen bar thaw in the fridge overnight. Need a quick fix? Let it sit on the counter for 20 minutes for a frosty treat.

    Did you make this recipe?

    Share a photo and tag us — we can’t wait to see what you’ve made!

  • Mexican Sweet Corn Cake (Pastel De Elote)

    Mexican Sweet Corn Cake (Pastel De Elote)

    I recently baked this sweet corn cake for a Sunday family dinner. The plates were practically licked clean.

    If there is one dessert that perfectly captures the heart of traditional Latin American baking, it is this one. Pastel De Elote. Or, as we call it, Sweet Corn Cake.

    Now, this is not your regular savory cornbread. You know, the crumbly stuff you eat with a bowl of chili. This is a totally different experience.

    It is rich. It is moist. It is wonderfully dense. Eating a slice feels like a warm hug. It perfectly bridges the gap between a classic sponge cake and a comforting pudding.

    Corn is a massive deal in Mesoamerican culture. It has been a sacred ingredient for thousands of years. Using it to make sweet treats is a beautiful tradition. A tradition passed down through generations.

    I really wanted to share this specific recipe with you. Why? Because it perfectly balances the rustic sweetness of whole corn with a buttery crumb.

    Having a fancy dinner party? Craving a cozy afternoon slice with your coffee? This easy pan de elote will quickly become your favorite bake.

    Let’s roll up our sleeves. It is time to bake!

    Mexican Sweet Corn Cake

    Recipe Overview

    Before we grab our mixing bowls, let’s look at what to expect. Making this cake is easier than riding a bike.

    Here is the time breakdown:

    • Active prep time: About 15 minutes. This is just creaming butter and mixing batter.
    • Baking time: 25 to 32 minutes.
    • Total cook time: I like to plan for 40 minutes total. The cake needs a few minutes to rest and set in the pan before you cut it.

    Start to finish, you need just under an hour.

    This standard recipe makes 8 huge slices. But maybe you need to feed a bigger crowd. The good news? It scales beautifully.

    Here is a quick guide to help you size up:

    Serving SizeButterSugars (Total)EggsFlourCorn Kernels
    8 Slices (1x)4 tbsp1 cup33/4 cup + 2 tbsp1 cup
    16 Slices (2x)8 tbsp (1 stick)2 cups61 3/4 cups2 cups
    24 Slices (3x)12 tbsp3 cups92 1/2 cups + 2 tbsp3 cups

    I would call this bake very beginner-friendly. If you know how to turn on a mixer and measure flour, you can easily make this cake.

    For tools, you need an electric hand mixer or a stand mixer. This is to cream the butter and sugar properly.

    For the pan, a standard bundt cake pan works great. It looks very elegant. But a 9-inch cast-iron skillet is an amazing choice too. The skillet gives you perfectly crispy, caramelized edges.

    Do you love meal-prepping? This cake is a fantastic make-ahead dessert. Honestly, many professional bakers say corn cake tastes even better the next day. Giving it 24 hours lets the flavors mix. It also spreads the moisture evenly through the cake.

    Ingredients

    Getting good ingredients is the secret to making this cake shine.

    The Sugars:

    • 1/2 cup brown sugar
    • 1/2 cup white granulated sugar

    Mixing them is important. The white sugar gives structure and a clean sweetness. The molasses in the brown sugar? It adds moisture and a deep caramel flavor.

    The Wet Ingredients:

    • 4 tbsp butter (must be room temperature)
    • 3 eggs (also room temperature)
    • 1/2 tsp pure vanilla extract
    • 1 1/2 tbsp corn oil

    The corn oil might seem small. But do not skip it. It is the secret trick for a tender crumb. It stops the cake from drying out in the oven.

    The Dry Ingredients:

    • 3/4 cup + 2 tbsp white all-purpose flour
    • 3/4 tsp baking powder (for a gentle lift)
    • 1/8 tsp kosher salt (to balance the sweet)

    The Liquids and Mix-ins:

    • 1/2 cup half-and-half
    • 1 cup corn kernels

    The half-and-half adds a rich luxury. Regular milk just cannot match it.

    For the corn, you can use fresh summer corn sliced off the cob. Or, use frozen corn. Just make sure it is fully thawed and patted dry with a towel.

    Missing something? Do not panic.

    • No half-and-half? Mix equal parts whole milk and heavy cream. Evaporated milk works in a pinch too.
    • Only have canned corn? That is perfectly fine. Just drain it really well. Rinse off the salty water before using it.

    Step-by-Step Method

    Let’s get cooking!

    Step 1: Prep your tools.

    Preheat your oven to 375°F. Prepare your pan right now. You do not want your wet batter waiting around later. Take a little extra butter. Rub it all over the inside of your bundt pan or 9-inch iron skillet. Get into every single corner. Dust it lightly with flour. Tap out the extra. This builds a non-stick wall so your cake pops out easily.

    Step 2: Cream the butter.

    Put your room-temperature butter and both sugars into your mixer bowl. Turn it to medium speed. You want to cream them together until it looks pale, light, and fluffy. This takes about three to four minutes. You are basically punching tiny air bubbles into the butter. This makes the cake light, not heavy.

    Sweet Corn Cake Mixture

    Step 3: Add the eggs.

    Add your room-temperature eggs. One at a time. Beat the mix well after every egg. Wait until the first egg vanishes before adding the second. Do not rush and dump them all at once! Adding them all at once is like trying to mix oil and water. It will curdle. Once the eggs look good, blend in the vanilla extract and the corn oil.

    Step 4: Add the dry goods.

    Turn your mixer down to the lowest speed. Gently add your white flour, baking powder, and kosher salt. Mix this just until the dry flour streaks disappear. If you mix it too much, it gets chewy. Overmixed cake turns into tough bread.

    Corn mixed

    Step 5: Bring it together.

    Keep the mixer on low. Slowly pour in the half-and-half. Mix until the batter looks smooth. Take the bowl off the mixer stand. Grab a rubber spatula. Gently fold in your 1 cup of corn kernels by hand. Make sure they are spread out evenly.

    Step 6: Bake it.

    Pour the batter into your greased pan. Use the spatula to smooth the top. Put it on the middle rack of your oven. Bake for 25 to 32 minutes.

    Look for these signs:

    • Your kitchen smells like toasted sugar.
    • The edges pull away from the pan slightly.
    • The top looks golden brown.
    • When you gently poke the center, it springs back.

    Take it out. Let it cool in the pan for a few minutes before you cut it.

    Pastel De Elote

    Variations & Customization

    The best thing about this recipe? You can change it up easily.

    • Need it gluten-free? Swap the white flour for a 1-to-1 gluten-free baking flour. Just make sure it has xanthan gum.
    • Need it dairy-free? Use a plant-based butter stick. Swap the half-and-half for rich oat milk or full-fat coconut milk. Coconut milk actually tastes amazing with sweet corn!
    • Want more spice? Add a pinch of ground cinnamon. Or a tiny dash of nutmeg. This makes it smell like a fancy bakery.
    • Want a custard texture? Bake the pan inside a water bath covered with foil. The steam makes it ultra-moist. It becomes a spoonable pudding.
    • Want a rustic crunch? Swap a quarter cup of the white flour for yellow cornmeal. This gives the cake a nice bite.

    Serving & Storage

    This cake tastes best warm. Slice it thick.

    I highly recommend topping it with cajeta. That is a thick, rich Mexican caramel sauce made from goat’s milk. Cannot find cajeta? A good regular caramel sauce is perfectly fine.

    Add a scoop of fresh whipped cream. Toss on some sliced strawberries. Or, drop a giant scoop of vanilla bean ice cream right on top. Watch it melt over the warm cake. It is heavenly.

    Serve Sweet Corn Cake

    Got leftovers? They are super easy to store.

    Let the cake cool completely. Put the slices in an airtight container.

    • It stays good on the counter for 3 days.
    • It stays good in the fridge for up to a week.

    The wet corn keeps it from drying out like normal cakes.

    Ready to eat a leftover slice? Put it in the microwave for 15 to 20 seconds. It gets warm and soft instantly.

    You can also freeze it. Wrap totally cooled slices tightly in plastic wrap. Put them in a heavy freezer bag. They stay fresh in the freezer for up to three months. Just let a slice thaw in the fridge overnight. Or zap it in the microwave when that craving hits!

    Print

    Mexican Sweet Corn Cake (Pastel De Elote)

    5 Stars 4 Stars 3 Stars 2 Stars 1 Star

    No reviews

    I made this warm, dense cake for Sunday dinner. The plates were wiped clean.

    Pastel De Elote is not your standard savory cornbread. It is a rich, sweet dessert. A perfect cross between a fluffy sponge cake and a comforting pudding.

    The best part? It scales beautifully for any crowd and is incredibly easy to bake.

    • Author: Carlos
    • Prep Time: 15 minutes
    • Cook Time: 32 minutes
    • Total Time: 55 minutes (includes resting)
    • Yield: 8 generous slices 1x
    • Category: Dessert / Cake
    • Cuisine: Mexican / Latin American

    Ingredients

    Scale

    The Sugars

    • 1/2 cup brown sugar
    • 1/2 cup white granulated sugar

    The Wet Mix

    • 4 tbsp butter (room temperature)
    • 3 eggs (room temperature)
    • 1/2 tsp pure vanilla extract
    • 1 1/2 tbsp corn oil

    The Dry Mix

    • 3/4 cup + 2 tbsp white all-purpose flour
    • 3/4 tsp baking powder
    • 1/8 tsp kosher salt

    The Liquids & Mix-ins

    • 1/2 cup half-and-half
    • 1 cup corn kernels (fresh or thawed frozen)

    Instructions

    1. Prep the pan.

    Preheat your oven to 375°F. Generously rub butter inside a bundt pan or a 9-inch cast-iron skillet. Dust it lightly with flour. Tap out the extra. This is your non-stick shield.

    2. Cream the base.

    Put the room-temperature butter and both sugars into a mixer. Beat on medium speed for three to four minutes. You want it pale and fluffy. Like a soft cloud.

    3. Add the eggs.

    Drop in the eggs one at a time. Mix well after each one. Wait until the egg vanishes before adding the next. Do not rush this. Once combined, stir in the vanilla extract and corn oil.

    4. Mix the dry goods.

    Turn the mixer to low. Gently add the flour, baking powder, and salt. Mix just until the dry streaks disappear. Overmixing makes the cake chewy.

    5. Finish the batter.

    Keep the speed on low. Pour in the half-and-half until smooth. Remove the bowl from the stand. Grab a rubber spatula. Gently fold in the corn kernels by hand.

    6. Bake and cool.

    Pour the batter into your greased pan. Smooth the top. Bake on the middle rack for 25 to 32 minutes. It is done when the edges pull away and the center springs back. Let it rest in the pan before slicing.

    Notes

    Serving Suggestions

    Serve it warm. Drizzle heavily with cajeta (goat’s milk caramel) or standard caramel sauce. Top with fresh whipped cream. Or, add a big scoop of vanilla bean ice cream.

    Tips & Tricks

    • Need a custard texture? Bake the pan inside a foil-covered water bath. The steam makes it incredibly moist.
    • Missing half-and-half? Just mix equal parts heavy cream and whole milk.
    • Want a rustic crunch? Swap a quarter cup of the white flour for yellow cornmeal.

    Storage & Reheating

    • To Store: Keep leftovers in an airtight container. It lasts 3 days on the counter. It lasts a week in the fridge.
    • To Freeze: Wrap cooled slices tightly in plastic wrap. Freeze for up to three months.
    • To Reheat: Microwave a single slice for 15 to 20 seconds. It softens right up.

    Did you make this recipe?

    Share a photo and tag us — we can’t wait to see what you’ve made!

  • Authentic Mexican Sopaipillas Recipe

    Authentic Mexican Sopaipillas Recipe

    Hey friends. Let’s talk about sopaipillas.

    If you haven’t had one, you’re missing out. They are little fried pillows of dough. Pure magic.

    I remember the first time I whipped these up. We ate the whole batch standing right next to the stove in under ten minutes.

    The word comes from the Spanish sopaipa. It just means sweet fried dough. You drop flat triangles into hot oil. And bam. They blow up like tiny balloons.

    Making them is easier than tying your shoes. Let’s get into it.

    Authentic Mexican Sopaipillas Recipe

    Recipe Overview

    Here is the game plan. It moves fast once the dough rests.

    • Prep time: 10 minutes
    • Rest time: 30 minutes
    • Fry time: 15 minutes
    • Total: 55 minutes

    This makes 16 sopaipillas. Perfect for a family dinner.

    Difficulty? Super easy. You just need to watch the hot oil. You’ll need a bowl, a rolling pin, a big pot, and a slotted spoon.

    Pro tip: Use a pizza cutter to slice the dough. It glides right through. No tearing.

    What You Need

    You probably have this stuff in your pantry right now.

    • 2 cups flour: Spoon it into the cup. Don’t scoop it hard.
    • 1 tsp baking powder: This gives the dough its lift.
    • 1/4 tsp salt: For balance.
    • 2 tbsp shortening: Think of this as the secret to flaky dough. You can use lard or butter too.
    • 3/4 cup hot water: Not boiling. Just hot enough to melt the fat.
    • Vegetable oil: For frying. You need about 2 cups.
    • Toppings: Powdered sugar, cinnamon, and honey.

    Step-by-Step Method

    Ingridents

    1. Mix the dry stuff

    Whisk your flour, salt, and baking powder. Drop the shortening in the middle.

    Now, get your hands dirty.

    Rub the fat into the flour. It should look like wet sand. No big lumps.

    Mix the dry stuff

    2. Add water

    Pour the hot water in slowly.

    Mix it with your fingers. The dry bits will turn into a warm dough. It should feel tacky. Not a sticky mess.

    Too wet? Add a pinch of flour.

    Add water

    3. Knead it out

    Put the dough on the counter. Push it away with your palm. Fold it back. Turn it.

    Do this for 5 minutes.

    It will turn into a smooth, springy ball. Like a soft stress ball.

    Knead it out

    4. Let it rest

    Put it in a bowl. Cover it with a damp towel.

    Walk away for 30 minutes.

    Seriously. Do not skip this. The dough needs to relax. If you roll it now, it will fight you.

    5. Roll and cut

    Roll and cut

    Cut the dough into 4 pieces. Roll one into a ball. Cover the rest.

    Roll that ball flat. You want a 6-inch circle.

    How thick? About 1/8 to 1/4 of an inch.

    Too thin? You get crackers. Too thick? It stays raw inside. Cut the circle into four triangles.

    6. Fry time

    Heat your oil to 350ºF. Drop a tiny piece of dough in. If it floats and bubbles, you are good to go.

    Slide a few triangles in. Don’t crowd the pot.

    Fry time

    7. Watch them puff

    They should inflate right away.

    Stubborn piece of dough? Splash some hot oil on top with your spoon. That forces it to puff up.

    Cook until golden on the bottom. Flip. Cook the other side.

    It takes about 5 minutes total. Put them on a paper towel.

    Watch them puff

    Make It Your Own

    Need to change things up? Easy.

    • Vegan? Use coconut oil. Swap honey for maple syrup.
    • Gluten-free? Use a 1-to-1 baking flour. They won’t puff as much, but they still taste great.

    Want a savory meal? Skip the sugar.

    Bite open the warm dough. Stuff it with taco meat and cheese. Smother it in salsa. It’s like the best taco you’ve ever had.

    Serving & Storage

    Timing is everything here. Eat them warm. Fresh out of the oil.

    Dust them with cinnamon sugar. Bite off a corner. Pour honey right into the hollow middle.

    It makes a warm, sweet pocket. Pure heaven.

    Got leftovers? Keep them in a container on the counter for two days.

    Never use the microwave. They get rubbery.

    Toss them in a 200ºF oven for 5 minutes instead. Good as new.

    Print

    Authentic Mexican Sopaipillas Recipe

    5 Stars 4 Stars 3 Stars 2 Stars 1 Star

    No reviews

    These fluffy fried dough pillows are pure comfort. Golden and crispy on the outside. Warm and hollow on the inside. They are the ultimate vehicle for sweet honey or savory taco fillings. The best part? Making them at home is surprisingly simple.

    • Author: Carlos
    • Prep Time: 10min
    • Resting Time: 30min
    • Cook Time: 15min
    • Total Time: 55min
    • Yield: 16 1x
    • Category: Dessert
    • Method: Mexican
    • Cuisine: Mexican

    Ingredients

    Scale

    Ingredients for the Dough:

    • 2 cups flour 1 tsp
    • baking powder 1/4 tsp
    • salt 2 tbsp
    • shortening 3/4 cups hot water

    Ingredients for Frying:

    • 2 cups vegetable oil

    Ingredients for Dusting and Drizzling:

    • 1/4 cup confectioners sugar
    • 1 tsp. ground cinnamon
    • 4 tbsp. honey

    Instructions

    1. Mix the Base: Whisk the flour, salt, and baking powder in a large bowl. Drop the shortening right into the middle. Use your fingers to rub the fat into the dry mixture. Stop when it looks and feels like crumbly wet sand.

    2. Form the Dough: Slowly pour the hot water into the bowl. Mix everything together with your hands. The shaggy bits will quickly form a soft, warm dough.

    3. Knead Well: Move your dough to a clean counter. Push it away with your palm, fold it over, and turn. Knead like this for about 5 minutes. It will turn into a smooth, springy ball.

    4. Let it Rest: Put the dough back in the bowl. Cover it with a damp towel. Walk away for exactly 30 minutes. Do not skip this step. The dough needs time to relax so it rolls out easily.

    5. Roll and Slice: Cut the dough into 4 equal sections. Roll one section into a ball and cover the rest. Use a rolling pin to flatten that ball into a 6-inch circle. Keep it about 1/8-inch thick. Use a pizza cutter to slice the circle into four triangles.

    6. Fry to Perfection: Heat the vegetable oil in a large pot to 350 degrees. Gently drop a few triangles into the oil. They will inflate like tiny balloons. Fry until the bottoms are golden brown, then flip. It takes about 4 to 5 minutes total. Move them to a plate lined with paper towels.

    Notes

    Serving Suggestions: These demand to be eaten hot. Mix your confectioners sugar and cinnamon. Dust it heavily over the warm pastries. Bite off one crispy corner and pour your honey right into the hollow center.

    Pro Puffin Tip: Sometimes a triangle acts stubborn in the oil. If it lays flat, use your spatula to rapidly splash hot oil over the top. The sudden heat forces the dough to puff up instantly.

    Storage: Keep leftover sopaipillas in an airtight container on the counter for up to two days.

    Reheating: Never put these in the microwave. They will turn chewy and tough. Instead, place them in a 200 degree oven for 5 to 10 minutes to bring back that perfect crunch.

    Nutrition

    • Serving Size: 16
    • Calories: 100kcal
    • Sugar: 5g
    • Sodium: 31mg
    • Fat: 3g
    • Saturated Fat: 1g
    • Trans Fat: 1g
    • Carbohydrates: 17g
    • Fiber: 1g
    • Protein: 2g

    Did you make this recipe?

    Share a photo and tag us — we can’t wait to see what you’ve made!

  • Mexican Pink Cake Recipe (Pan Dulce Cortadillo)

    Mexican Pink Cake Recipe (Pan Dulce Cortadillo)

    Welcome to my kitchen! If you’ve ever walked into a traditional Mexican panadería, you probably saw them. Bright, cheery trays of sponge cake topped with a vivid pink glaze and a mountain of rainbow sprinkles.

    This is Cortadillo. Some call it Mexican Pink Cake. In my house, it’s just pure nostalgia. It’s often called the “children’s cake” (Pastel de Niño), and for good reason. It’s light, fluffy, and has that iconic, crackly pink topping that makes you feel like a kid again.

    The best part about this Mexican Pink Cake? It’s simple. This isn’t some heavy, stressful triple-layered birthday cake. It’s a humble sheet cake meant to be cut into squares. That’s actually where the name comes from—cortadillo means “cut.” It’s the perfect partner for a warm cup of coffee or café de olla.

    I recently tried a few different ways to make this at home. I found that adding a little cornstarch is the secret. It makes the cake much more tender than the ones you find in the store.

    Mexican Pink Cake

    Recipe Overview

    Before we get our hands messy, let’s look at the plan. This recipe is very forgiving. Even if you aren’t a pro baker, you can do this.

    • Time: 25 minutes to prep, 25 minutes to bake. You’ll be eating in about an hour.
    • Servings: This makes 16 good-sized slices.
    • Skill Level: Easy. If you can stir a bowl, you’re overqualified.
    • The Gear: You’ll need an 8″ x 11″ pan. Use a sifter if you have one—it keeps the cake light. A hand mixer is great, but a whisk and some arm strength work too.

    The good news? You can bake the cake a day early. Just wrap it up tight. Save the glaze for the day you want to eat it so it looks fresh and bright.

    Quick Reference Scaling Table

    Ingredient16 Servings (8″x11″ Pan)32 Servings (13″x9″ Pan)
    All-Purpose Flour2 ¼ cups4 ½ cups
    Sugar1 cup2 cups
    Vegetable Oil1 cup2 cups
    Large Eggs4 eggs8 eggs
    Whole Milk½ cup1 cup

    The Ingredients: Quality and Substitutions

    Most of this is probably already in your pantry. For the cake, you need 2 ¼ cups of all-purpose flour and a pinch of salt.

    The “pro” move? Add 2 tablespoons of cornstarch. Think of it like a cheat code. It softens the flour so the cake feels like a cloud. You’ll also need 3 teaspoons of baking powder for the lift.

    For the wet stuff:

    • 1 cup of sugar
    • 4 large eggs (room temperature is best)
    • 1 cup of vegetable oil

    I use oil instead of butter. Why? Because oil stays liquid at room temperature. It keeps the cake moist for days. Butter can make it get hard in the cupboard.

    To make it smell like a real bakery, use 2 teaspoons of vanilla extract and the zest of 1 lemon. If you like things a bit sour, use 3 tablespoons of lemon juice instead. Finally, grab ½ cup of whole milk.

    For that famous pink top:

    • 3 cups of confectioners’ sugar
    • 3 tablespoons of softened butter
    • 4 tablespoons of milk
    • Pink gel food coloring * Candy sprinkles

    Step-by-Step Method: A Guided Walkthrough

    1. Preparing the Foundation

    First, get your oven to 350°F. Spray your 8″ x 11″ pan with oil. Now, sift your flour, salt, cornstarch, and baking powder together. Don’t skip the sifting! It’s like giving the flour room to breathe. It makes the cake way fluffier.

    Mexican Pink Cake Ingredients Mix

    2. Creaming and Emulsifying

    In another bowl, whisk the eggs, sugar, vanilla, and oil. Keep going until it looks pale and frothy. You’re basically trapping air bubbles here. Those bubbles do the heavy lifting in the oven. Stir in that lemon zest last. It smells amazing.

    3. The Alternating Mix

    Here is the trick. Add a third of your flour mix, then half of your milk. Stir gently. Repeat this until it’s all in. Stop mixing as soon as the white flour disappears.

    If you over-mix? You get tough bread, not soft cake. The batter should look like thick heavy cream.

    4. Baking and Cooling

    Pour it in and bake for 20-25 minutes. You want the top to be light golden brown. Use a toothpick to check the center. If it comes out clean, you’re done.

    Wait! Let it cool completely. If the cake is even a little warm, your pink glaze will melt into a puddle.

    5. The Signature Pink Glaze

    Whisk your sugar, butter, milk, and vanilla. Add the pink color one drop at a time. Gel color is strong! Spread it over the cool cake and dump those sprinkles on immediately so they stick.

    Mexican Pink Cake Recipe

    Variations & Customization

    • Gluten-Free: Use a 1:1 gluten-free flour blend with xanthan gum.
    • Vegan: Use applesauce or flax eggs and almond milk.
    • Fancy Style: Slice the cake in half and put strawberry jam in the middle. It’s a total upgrade.
    Mexican Pink Cake Slices

    Serving & Storage

    Cut them into squares or the classic bakery triangles. It’s the perfect afternoon snack.

    • Storage: Keep it in a container at room temp for up to 3 days. It stays moist because of the oil.
    • Freezing: You can freeze the plain cake (no frosting) for 3 months. Just thaw it and glaze it when you’re ready.

    One last tip: Don’t put this in the fridge. The fridge is the enemy of this cake. It dries out the sponge and makes the glaze get all sticky and “sweaty.” Keep it on the counter!

    Print

    Mexican Pink Cake Recipe (Pan Dulce Cortadillo)

    5 Stars 4 Stars 3 Stars 2 Stars 1 Star

    No reviews

    If you’ve ever stepped into a Mexican bakery and seen those bright pink, sprinkle-covered squares, you’ve found Cortadillo. This classic pan dulce is essentially a “children’s cake” (Pastel de Niño)—a light, airy sponge topped with a signature crackly glaze. It’s simple, nostalgic, and perfect for dipping into your morning coffee. My version uses a dash of cornstarch for an extra-tender crumb, making it even better than the bakery version!

    • Author: Carlos
    • Prep Time: 25 minutes
    • Cook Time: 25 minutes
    • Total Time: 50 minutes
    • Yield: 16 slices
    • Category: Dessert / Bread
    • Cuisine: Mexican

    Ingredients

    For the Sponge:

    • All-Purpose Flour: 2 ¼ cups
    • Cornstarch: 2 tablespoons (the secret to a soft crumb)
    • Baking Powder: 3 teaspoons
    • Salt: A pinch
    • Sugar: 1 cup
    • Vegetable Oil: 1 cup
    • Large Eggs: 4 (room temperature)
    • Whole Milk: ½ cup (room temperature)
    • Vanilla Extract: 2 teaspoons
    • Lemon Zest: From 1 lemon (or 3 tbsp lemon juice)

    For the Pink Glaze:

    • Confectioners’ Sugar: 3 cups
    • Butter: 3 tablespoons (softened)
    • Whole Milk: 4 tablespoons
    • Pink Gel Food Coloring: A few drops
    • Rainbow Sprinkles: As many as your heart desires

    Instructions

    1. Prep the Oven: Heat your oven to 350°F. Grease an 8″ x 11″ baking pan.
    2. Sift Dry Ingredients: Sift your flour, cornstarch, baking powder, and salt. This removes lumps and keeps the cake light.
    3. Whisk the Wet Mix: In a large bowl, whisk eggs, sugar, oil, and vanilla until pale and frothy. Stir in the lemon zest.
    4. The Alternate Mix: Add about a third of the flour mix to the wet bowl, then half of the milk. Stir gently. Repeat until just combined. Don’t over-mix!
    5. Bake: Pour into the pan. Bake for 20-25 minutes. A toothpick in the center should come out clean.
    6. Cool Completely: Let the cake cool in the pan. If it’s warm, the glaze will melt right off.
    7. Glaze & Sprinkle: Whisk the icing ingredients until smooth. Add pink dye until you get that perfect “bakery pink.” Spread it on and immediately top with sprinkles.

    Notes

    Serving Suggestions:

    • The Classic Way: Slice into traditional triangles or squares and serve with café de olla.
    • Fancy it up: Add a dollop of whipped cream or fresh strawberries on the side.

    Tips & Tricks:

    • Room Temp Matters: Make sure your eggs and milk aren’t cold. It helps the batter emulsify for a smoother cake.
    • Oil over Butter: I always use oil here. It keeps the sponge moist and soft, even if you eat it the next day.
    • Sift, Sift, Sift: It seems like an extra step, but it’s the difference between a dense cake and a “cloud” cake.

    Storage & Reheating:

    • On the Counter: Keep it in an airtight container for up to 3 days.
    • Freezing: You can freeze the un-frosted sponge for up to 3 months. Wrap it tight!
    • Avoid the Fridge: Seriously—the fridge dries out the cake and makes the pink glaze sticky and “sweaty.” Keep it at room temperature.

    Did you make this recipe?

    Share a photo and tag us — we can’t wait to see what you’ve made!